GPF Docs
Coin Flipper Walkthrough
Coin Flipper Walkthrough
Coin Flipper is a single-player demonstration where the player's longest streak of flipping 'heads' is sent up to the leaderboard. This article documents the engineering behind Coin Flipper.
Run the Tests locally
- Change the project to
Simulatedmode inUnity Editor -> GPF -> Settings -> Backend Type - Open Test Runner
Unity Editor -> Window -> General -> Test Runner - Run
HellContentTest, see it turn Green. - Run
CoinTest, see it turn Green. - Right Click on
CoinTestand open the source code.
Notice that:
- The
CoinTestclass extendsServerObjectTest - There is a function to simulate player actions
PlayerActions. - The main entry point
Runstarts multiplePlayerActionsin parallel to simulate players. - Each player creates a
SyncerusingServerObjectTest.CreateSyncer - Players use
Syncer.SendWaitto set the username, this will return when the server has processed the message - Players send a coin
Flipmessages withSyncer.Send(which returns immediately) - Players wait for the coin flip to resolve with
Syncer.WaitForwhich will return once the server has determined the result
Server Objects
Now skim through the code for every ServerObject (CoinPlayerSO, CoinLeaderboardSO). Our ServerObject Guide Video provides a detailed breakdown of what these ServerObjects do.
Below we will diagram what the server objects do. This is where the stateful part of the game is defined. These SO's are all located here: Assets\ServerObjects
| SO Name | Description |
|---|---|
| CoinPlayerSO | Represents the player, handles flipping coin |
| CoinLeaderboardSO | Stores everyone's top score. Sends the top few scores to players upon request |
Sequence diagrams are ideal to visualize how SO's work. Try to match the code up with the sequence diagram.
Run the Game
Now let's actually play the game.
- Open the
Coinscene in theAssets/folder. - Click the play button, and flip the coin.
- Open the
Data ExplorerGFP -> Data Explorerso you can watch the state of the game change as you play through. You will have to select theData Explorerto make sure it's up to date. - The goal is to get the yellow side as many times as possible.
UI
At this point we should understand how state is determined and how the game looks, but now lets look at how the SO's are hooked up to UI.
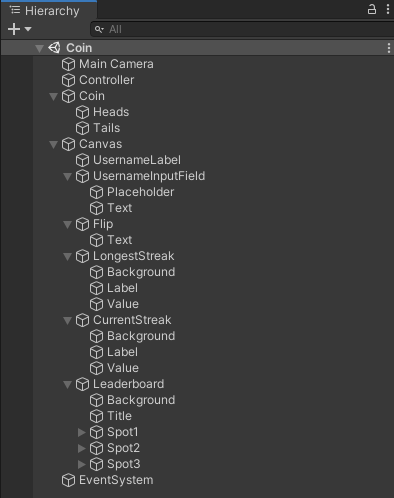
Open the Heirarchy for the Coin scene in the Assets/ folder and notice the Controller GameObject has a script attached to it called CoinController.cs (/Assets/Scripts). Open that.
CoinController.cs does the following:
- Creates a
Syncer, which provides- The ability to sync UI to SOs
- The ability to send messages to SOs.
- Adds an alias to the
DataStoreso theCoinPlayerSOstate can be easily referenced by the UI (See Hooking Up UI) - Event functions for the
ButtonandInput Fieldto connect to in the scene (Flip,SetUsername)
Let's look at ViewBindings on the the Hierarchy

If you turn on the inspector panel, you will notice some GameObjects have ViewBindings:
| UI | ViewBinding | bound to variable |
|---|---|---|
| Canvas.UsernameInputField | TextInputVB | player.username |
| Canvas.LongestStreak.Value | TextVB | player.longestStreak |
| Canvas.CurrentStreak.Value | TextVB | player.currentStreak |
| Canvas.Leaderboard | LeaderboardVB | player.leaderboard |
You will also notice components have events that reference CoinController functions for example:
| UI | Function (defined in CoinController.cs) |
|---|---|
| Canvas.UsernameInputField | SetUsername |
| Canvas.Flip | Flip |
© 2023 Launch It Labs INC